Direct Answer: Most hardscape failures start underground — poor base preparation, wrong drainage, or materials that can’t handle the local climate. What’s on top is only as good as what’s underneath.
A lot of hardscape looks great on installation day. The pavers are level, the stone is clean, the joints are tight. Then two winters pass, and the whole thing is heaving, cracking, or draining onto the house foundation. Homeowners on the Monterey Peninsula see this happen more often than they should.
The Central Coast is a genuinely difficult environment for hardscape. Salt air, moisture cycling, and seismic ground movement put stress on patios, walkways, and retaining walls year-round — stresses that expose every shortcut the installer took during construction. Carmel clay soils shift with seasonal rain. Pebble Beach sand drains fast but undermines unsupported bases. What works in the Central Valley often doesn’t hold up here.
This article focuses on two things that separate long-lasting hardscape from work that fails in three to five years: base preparation and material selection for coastal conditions. These aren’t the most exciting topics, but they’re where most installations either succeed or quietly fall apart.
Why the Base Matters More Than the Stone on Top
Ask any experienced mason what causes most hardscape failures and they’ll say the same thing: the problem started before the first paver was ever set. The visible surface — stone, brick, concrete, pavers — gets all the attention. But it’s the base layers underneath that determine whether that surface holds.
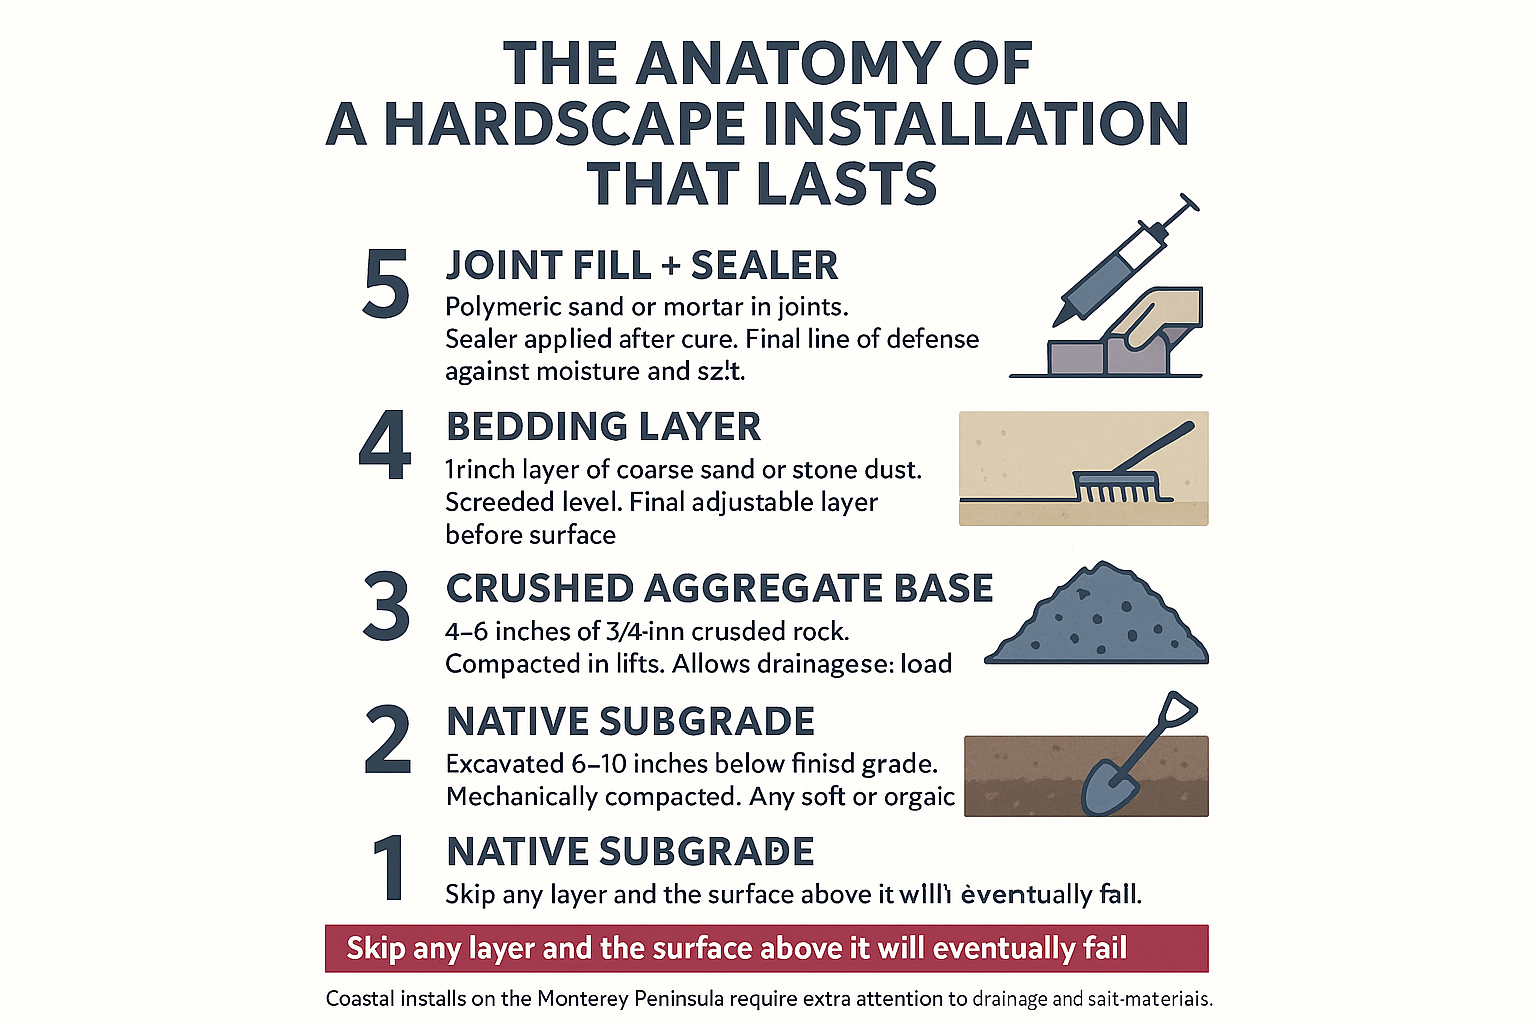
A proper hardscape base typically includes:
- Subgrade compaction — the native soil underneath is excavated to the right depth and mechanically compacted, not just scraped flat
- Crushed aggregate base — 4 to 6 inches of compacted crushed rock, which distributes load and allows water to move through
- Bedding layer — a thin, level layer of coarse sand or stone dust that the surface material sits in
- Proper slope — a minimum 1% to 2% grade away from structures, so water doesn’t pool or wick toward a foundation
In Monterey County, skipping any of these steps is especially costly. The Salinas Valley and inland Carmel Valley areas have expansive clay soils that swell when wet and shrink when dry. Without proper compaction and drainage, that movement telegraphs straight up through the base and into the surface. You’ll see it as uneven pavers, cracked stone, or joints that start to open up after the first rainy season.
As the Stonecap team explains in why patios and walkways sink or crack even when the materials are strong, the material itself is rarely the culprit. It’s almost always what was done — or not done — before it was installed.
Material Selection for the Monterey Peninsula’s Coastal Environment
Not every stone, paver, or mortar performs the same way near the ocean. The Monterey Bay coastline — from Pacific Grove out to Carmel Beach — runs some of the saltiest air in California. That salt penetrates porous materials, accelerates freeze-thaw damage, and causes certain mortars and sealers to fail faster than the manufacturer’s data suggests.
A few things worth knowing before choosing materials:
Porosity matters more than looks. Dense, low-absorption stones like granite and bluestone hold up far better in coastal salt air than softer, more porous materials like sandstone or some natural limestone. Porous materials absorb moisture, salt crystallizes inside the pores as they dry, and the surface spalls — chips and flakes — within a few seasons.
Mortar mix selection is not one-size-fits-all. Type S mortar is typically required for exterior and below-grade applications in California, but coastal installs often benefit from additives that improve moisture resistance. A mason who uses the same mortar mix on a Pebble Beach patio as they would on an interior fireplace facing is cutting a corner that will show up within a few years.
Sealers are a tool, not a fix. Sealing pavers or stone is worth doing — it slows moisture intrusion and reduces salt penetration. But sealing over a bad base or a weak mortar joint doesn’t correct those problems. It just delays when they become visible.
For homeowners considering pavers in a yard or patio setting, the choice between concrete pavers and natural stone isn’t just aesthetic. Concrete pavers with a Class 1 absorption rating perform significantly better in coastal conditions than lower-rated options, even if they cost less at purchase.
The same material-selection discipline applies to fire features. Homeowners planning a fire pit or outdoor fireplace on the Monterey Peninsula need refractory materials that handle both heat cycling and coastal humidity — a combination that eliminates a lot of the budget options you’d see used in drier inland climates.
The Anatomy of a Hardscape Installation That Lasts
This breakdown shows the critical layers of a properly built patio or walkway — from native soil to finished surface — and what happens when any layer is skipped.
Common Hardscape Failure Causes and What They Look Like
Most hardscape problems trace back to one of a handful of root causes. This table shows what each failure looks like on the surface and what’s usually happening underneath.
| What You See | Likely Root Cause | When It Usually Appears |
|---|---|---|
| Pavers sinking or rocking | Inadequate base compaction or base depth | 1–3 years after installation |
| Surface cracking in a pattern | Expansive soil movement, no base isolation | After first or second rainy season |
| Mortar joints crumbling or flaking | Wrong mortar mix for coastal exposure | 2–5 years after installation |
| Water pooling near foundation | Insufficient grade or missing drainage | First significant rainfall |
| Stone surface spalling or pitting | Porous material in salt air environment | 3–7 years, accelerates with time |
| Retaining wall leaning or bowing | No drainage behind wall, hydrostatic pressure | 2–4 years after installation |
What a Contractor’s Bid Should Tell You About the Work They’re Planning
A bid that doesn’t mention base depth, compaction, or drainage is telling you something — it’s telling you those things weren’t planned for. When comparing quotes for a patio, retaining wall, or walkway on the Monterey Peninsula, the numbers alone won’t explain the $8,000 to $15,000 spread that’s common between the lowest and highest bidders on the same project.
That gap usually comes down to a few specific line items that cheap bids skip:
- Excavation depth — a proper patio base often requires removing 8 to 10 inches of material. That’s a real cost in labor and haul-off.
- Compaction equipment — hand tamping isn’t the same as mechanical plate compaction. It’s faster and cheaper, but the base won’t hold the same way.
- Drainage provisions — French drains, gravel drainage blankets behind retaining walls, and surface slope engineering all add cost and all prevent failures.
- Material grade — the difference between a standard concrete paver and a Class 1 coastal-rated paver is real money per square foot, but it shows up in how the surface looks at year seven.
As explained in why two stonework quotes for the same project can be wildly different, a low bid isn’t always a savings — sometimes it’s a preview of a repair bill. And in Monterey County’s permit-required projects, skipping steps can also mean failing inspection, which costs more to fix after the fact than doing it right the first time.
California’s 2025 Title 24 building standards, effective January 1, 2026, also affect how certain permitted hardscape and structural masonry work must be documented and constructed. Any contractor unfamiliar with those standards is worth questioning before you sign anything.
Retaining Walls: Where Base and Drainage Failures Get Expensive Fast
A poorly built patio is an inconvenience. A poorly built retaining wall is a safety issue.
Retaining walls on hillside lots — common throughout Carmel Valley, the Pebble Beach hillsides, and parts of Salinas — hold back soil that wants to move downhill. If the base isn’t set deep enough, the drainage behind the wall isn’t designed correctly, or the wall wasn’t built to handle the lateral soil pressure it’s actually holding, the wall will lean, crack, or fail. In a seismic zone like Monterey County, those failures can happen faster and more dramatically than in lower-risk regions.
The single most common retaining wall failure on the Peninsula isn’t the wall itself — it’s hydrostatic pressure from water with nowhere to go. When water saturates the soil behind a wall and can’t drain, it pushes. Walls without proper gravel backfill and drainage outlets (called weep holes) experience that pressure every rainy season until something gives.
For anyone evaluating whether an existing retaining wall has problems worth addressing, understanding the difference between cosmetic masonry damage and structural failure is a useful starting point before calling a contractor.
Frequently Asked Questions About Hardscape Installation Quality
How deep should the base be for a patio or walkway in Monterey County?
For a standard paver patio, a 4 to 6 inch compacted crushed aggregate base is a common minimum. In areas with clay soils — common in Salinas and inland Carmel Valley — going deeper or adding a geotextile fabric layer between the soil and the base is worth discussing with your contractor. The right answer depends on soil conditions, load expectations, and whether the project requires a permit.
Does all hardscape on the Monterey Peninsula need a building permit?
Not always. Permit requirements vary by project type, jurisdiction, and scope. Retaining walls above a certain height typically require permits in Monterey County. Some patio and walkway projects do not. The safest approach is to ask your contractor and verify with the local planning or building department for your specific municipality before work begins.
What’s the most reliable way to check if a masonry contractor is actually licensed in California?
Use the CSLB’s free online license check tool at cslb.ca.gov. Search by license number or business name. You can see the license type, status, expiration date, and whether the contractor carries workers’ compensation insurance. For masonry work, look for a C-29 classification — that’s the state-designated license for masonry contractors.
Can I seal pavers or stone myself to protect against the coastal environment?
Yes, sealing is a reasonable maintenance task for a homeowner. But the sealer is only as effective as the surface underneath it. If joints are failing or the base is compromised, sealing over the top delays the visible symptoms without fixing the problem. Make sure the surface is in good structural shape before sealing.
How long should a properly built stone patio last on the Monterey Peninsula?
With correct base preparation, appropriate materials for coastal conditions, and basic maintenance like joint inspection and periodic resealing, a well-built stone or paver patio should last 20 to 30 years or longer. The ones that fail in 5 to 7 years almost always had a base or drainage problem from day one.
Thinking Through a Patio, Walkway, or Retaining Wall Project?
Stonecap Masonry works with homeowners across the Monterey Peninsula — from Salinas and Pacific Grove to Carmel and Carmel Valley — on hardscape projects built to hold up in this specific coastal environment. If you have questions about a project you’re planning or want to understand what a proper installation actually involves, reach out to the Stonecap team at 831-262-0442 or visit stonecapmasonry.com to get started.
